
Here’s a recipe for Homemade Pop-Tarts using premade pie crust:
Ingredients:
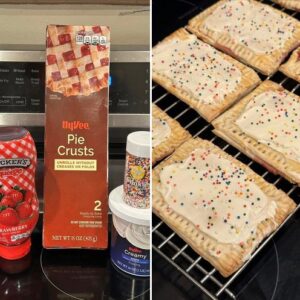
- 2 boxes of premade pie crust
- Strawberry jelly (or your favorite flavor)
- 1 egg
- Frosting (store-bought or homemade)
- Sprinkles
Instructions:
- Preheat the Oven: Preheat your oven to 425°F (220°C) and line a baking sheet with parchment paper.
- Prepare the Pie Crust: Lay out each pie crust and cut out rectangles the size of a pop-tart. You should get 8 rectangles from each pie crust. You’ll have a total of 16 rectangles.
- Assemble the Pop-Tarts: Place 8 of the rectangles on the prepared baking sheet. Spoon about 1 teaspoon of strawberry jelly onto each rectangle, spreading it out evenly, leaving a small border around the edges. Top each jelly-covered rectangle with one of the remaining 8 rectangles. Use a fork to crimp and seal the edges of each pop-tart to prevent the filling from leaking out during baking. Poke a few holes in the top of each pop-tart with a toothpick to allow steam to escape during baking.
- Brush with Egg Wash: In a small bowl, beat the egg. Brush the tops of each pop-tart with the egg wash using a pastry brush. This will give the pop-tarts a golden brown color when baked.
- Bake: Place the baking sheet in the preheated oven and bake the pop-tarts for 7-8 minutes, or until they are lightly golden brown.
- Cool and Decorate: Once baked, transfer the pop-tarts to a wire cooling rack and let them cool completely. Once cooled, spread frosting over the top of each pop-tart and sprinkle with your favorite sprinkles.
- Serve and Enjoy: Serve the homemade pop-tarts immediately, or store them in an airtight container in the refrigerator. They can be enjoyed cold or warmed up in a toaster oven or microwave before serving.
These homemade pop-tarts are sure to be a hit with your kids, and they’ll have fun helping you make them too!
Here are some tips to make your Homemade Pop-Tarts using premade pie crust even more delightful:
- Experiment with Fillings: While strawberry jelly is a classic choice, feel free to experiment with different fillings like blueberry jam, apple butter, Nutella, or even savory options like cheese and ham.
- Add Some Texture: Consider incorporating texture into your pop-tarts by mixing chopped nuts, chocolate chips, or shredded coconut into the filling.
- Customize the Frosting: Instead of using plain frosting, consider adding flavor extracts like vanilla, almond, or citrus to your frosting for an extra layer of flavor.
- Decorate Creatively: Get creative with your decorations! Try using colored icing or edible glitter to make your pop-tarts more visually appealing.
- Play with Shapes: Instead of traditional rectangles, try cutting your pie crust into fun shapes like hearts, stars, or even animals using cookie cutters.
- Brush with Flavored Syrups: Before baking, brush the tops of your pop-tarts with flavored syrups like maple or honey for an added burst of flavor and shine.
- Make Mini Versions: Cut your pie crust into smaller rectangles to make mini pop-tarts, perfect for snacking or serving as bite-sized treats.
- Serve with Ice Cream: Turn your Homemade Pop-Tarts into a decadent dessert by serving them warm with a scoop of vanilla ice cream on top.
- Drizzle with Chocolate: After frosting your pop-tarts, drizzle them with melted chocolate for an indulgent finishing touch.
- Store and Reheat Properly: To keep your pop-tarts fresh, store them in an airtight container in the refrigerator. When ready to enjoy, reheat them in a toaster oven for a crispy exterior or in the microwave for a softer texture.
With these tips, your Homemade Pop-Tarts will be even more delightful and sure to impress!
Here are some secrets to help you reach pop-tart perfection:
- Chill the Dough: Before working with the pie crust, make sure it’s thoroughly chilled. This helps prevent the dough from becoming too soft and sticky, making it easier to handle and shape.
- Even Thickness: Roll out the pie crust to an even thickness. This ensures that your pop-tarts cook evenly and have a uniform texture throughout.
- Use Quality Ingredients: Opt for high-quality pie crust, jelly, and frosting. Using good ingredients can significantly enhance the flavor and texture of your pop-tarts.
- Seal the Edges Well: Properly seal the edges of each pop-tart to prevent the filling from leaking out during baking. Press down firmly with a fork to create a tight seal.
- Ventilate Properly: Poke a few holes in the top of each pop-tart with a toothpick or fork before baking. This allows steam to escape during baking, preventing the pop-tarts from bursting open.
- Don’t Overfill: Avoid overfilling the pop-tarts with jelly or other fillings. Too much filling can lead to leaks and make it difficult to seal the edges properly.
- Egg Wash for Shine: Brushing the tops of the pop-tarts with an egg wash before baking helps create a beautiful golden brown crust and adds shine to the finished product.
- Monitor Baking Time: Keep a close eye on the pop-tarts while they’re baking to prevent them from overcooking. Remove them from the oven as soon as they turn lightly golden brown.
- Cool Completely: Allow the pop-tarts to cool completely on a wire rack before frosting and decorating. This prevents the frosting from melting and ensures a clean presentation.
- Store Properly: Store leftover pop-tarts in an airtight container in the refrigerator for maximum freshness. They can be reheated in a toaster oven or microwave before serving.
By following these secrets, you’ll be well on your way to creating the perfect Homemade Pop-Tarts that are sure to impress!
Here are some frequently asked questions and answers related to Homemade Pop-Tarts using premade pie crust:
- Can I use store-bought pie crust for Homemade Pop-Tarts?
- Yes, using store-bought pie crust makes the process quicker and easier. Just make sure to follow the instructions for rolling out the dough and cutting it into rectangles.
- Can I make Homemade Pop-Tarts ahead of time?
- Yes, you can prepare the pop-tarts ahead of time and store them in the refrigerator before baking. Alternatively, you can bake them ahead of time and store them in an airtight container for a few days.
- Can I freeze Homemade Pop-Tarts?
- Yes, you can freeze unbaked pop-tarts for up to a month. Place them on a baking sheet in a single layer and freeze until solid. Then transfer them to a freezer bag or container. When ready to bake, simply place them on a baking sheet and bake from frozen, adding a few extra minutes to the baking time.
- Can I use different fillings for Homemade Pop-Tarts?
- Absolutely! You can use a variety of fillings such as fruit preserves, Nutella, peanut butter, or even savory fillings like cheese and ham. Get creative and experiment with different flavors.
- How do I prevent my Homemade Pop-Tarts from leaking during baking?
- Make sure to seal the edges of the pop-tarts tightly with a fork to prevent the filling from leaking out during baking. Also, avoid overfilling the pop-tarts with filling.
- Can I make Homemade Pop-Tarts without frosting?
- Yes, you can skip the frosting if you prefer. The pop-tarts will still be delicious without it. You can also dust them with powdered sugar or drizzle them with melted chocolate for added flavor.
- Can I reheat Homemade Pop-Tarts?
- Yes, you can reheat Homemade Pop-Tarts in a toaster oven or microwave until warm. They’re great for a quick breakfast or snack on the go.
- How do I store leftover Homemade Pop-Tarts?
- Store leftover Homemade Pop-Tarts in an airtight container in the refrigerator for up to a few days. Reheat them in the toaster oven or microwave before serving.
- Can I use homemade pie crust instead of store-bought for Homemade Pop-Tarts?
- Yes, you can use homemade pie crust if you prefer. Just make sure to roll it out to the appropriate thickness and follow the same steps for assembling and baking the pop-tarts.
- Can I make Homemade Pop-Tarts in different shapes?
- Absolutely! Get creative and use cookie cutters to cut the pie crust into different shapes like hearts, stars, or even animals. Have fun with it!