
Here’s the recipe for a simple DIY stain remover using common household ingredients:
DIY Homemade Stain Remover
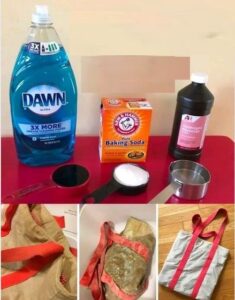
Ingredients:
- 1 part Dawn dish liquid (the blue one)
- 1 part baking soda
- 2 parts hydrogen peroxide
Equipment:
- Clean, empty spray bottle or container
Instructions:
- Prepare Spray Bottle:
- Find a clean, empty spray bottle or container to mix and store your stain remover.
- Mix Dawn & Baking Soda:
- In the spray bottle, combine equal parts of Dawn dish liquid and baking soda. For example, if you use 1 cup of Dawn, use 1 cup of baking soda.
- Add Hydrogen Peroxide:
- Pour in double the amount of hydrogen peroxide compared to the Dawn and baking soda mixture. For example, if you used 1 cup each of Dawn and baking soda, add 2 cups of hydrogen peroxide.
- Mix Thoroughly:
- Gently shake or stir the mixture in the spray bottle until all ingredients are fully blended. This will be your potent stain-fighting solution.
Usage:
- Application: Spray the homemade stain remover directly onto stains before washing.
- Let Sit: Allow the solution to sit on the stain for a few minutes, especially for tough or set-in stains.
- Wash as Usual: Wash the garment or fabric as usual, following the care instructions. Watch as the stain disappears with the cleaning power of this homemade remedy!
Tips:
- Test First: Before using on delicate fabrics or colored items, test the stain remover on a small, inconspicuous area to ensure it doesn’t cause any damage or discoloration.
- Freshness: Make a fresh batch as needed. Store any leftover stain remover in a cool, dark place and shake well before each use.
- Variations: You can adjust the ratios slightly based on the severity of stains or personal preference, but maintain the basic 1:1:2 ratio of Dawn, baking soda, and hydrogen peroxide.
This DIY stain remover is effective, affordable, and uses ingredients commonly found in most households. It’s perfect for tackling a variety of stains on clothing, upholstery, and other fabrics.
Here are some tips to make your DIY Homemade Stain Remover even more effective and delightful:
- Use Warm Water for Mixing: Warm water can help dissolve the ingredients more effectively, especially the baking soda. It ensures a smoother mixture without clumps.
- Use Distilled Water: If your tap water is hard or has a lot of minerals, using distilled water can prevent any residue from forming on fabrics after using the stain remover.
- Add Essential Oils: For a pleasant scent and additional cleaning properties, add a few drops of essential oils like lavender, lemon, or tea tree oil. These oils also have antimicrobial properties.
- Adjust the Ratios: Depending on the type of stains you typically deal with, you can adjust the ratios slightly. For tougher stains, you might increase the amount of Dawn or hydrogen peroxide slightly.
- Pre-treat Stains: For really tough stains, consider pre-treating them by spraying the stain remover directly onto the stain and letting it sit for 10-15 minutes before washing.
- Use a Brush or Cloth: After applying the stain remover, gently scrub the stained area with a soft brush or cloth to help loosen the stain before washing.
- Store in a Dark Bottle: To preserve the potency of the hydrogen peroxide, store your stain remover in an opaque or dark spray bottle. This helps prevent light from degrading the peroxide.
- Label and Date: Always label your homemade stain remover with its contents and the date it was made. This helps you keep track of its freshness and effectiveness.
- Shake Well Before Use: Since the ingredients may settle over time, shake the bottle well before each use to ensure the mixture is well-blended.
- Spot Test: Before using the stain remover on a large or visible area of fabric, always do a spot test on a small, inconspicuous area to check for any adverse reactions.
- Use on Upholstery: This stain remover can also be used on upholstery and carpets. Test in an inconspicuous area first and blot (don’t rub) the stain.
- Rinse Thoroughly: After treating a stain, rinse the fabric thoroughly with water to remove any residue from the stain remover before laundering as usual.
- Air Dry if Possible: After treating the stain and washing the fabric, air dry it if possible. Avoid using a dryer until you are sure the stain is completely removed, as heat can set some stains.
- Combine with Laundry Detergent: For extra stain-fighting power in the laundry, add a tablespoon of this DIY stain remover to your regular detergent when washing heavily soiled items.
- Educate Others: Teach others in your household how to use the stain remover properly to ensure everyone can tackle stains effectively without damaging fabrics.
By following these tips, you’ll enhance the effectiveness and enjoyment of using your DIY Homemade Stain Remover, making it a versatile and reliable addition to your laundry routine!
Here are 40 secrets to achieving the perfect DIY Homemade Stain Remover:
- Quality Ingredients: Use high-quality ingredients like Dawn dish soap, baking soda, and hydrogen peroxide for effective stain removal.
- Proper Ratios: Maintain the correct ratios of 1 part Dawn dish soap, 1 part baking soda, and 2 parts hydrogen peroxide for optimal cleaning power.
- Warm Water Mixing: Use warm water to mix the ingredients to help dissolve them evenly and create a smooth consistency.
- Use Distilled Water: If your tap water is hard, use distilled water to prevent mineral deposits that can affect the stain remover’s effectiveness.
- Essential Oils: Add a few drops of essential oils like lavender or tea tree oil for a pleasant scent and added cleaning properties.
- Adjust for Stain Type: Adjust the amount of Dawn or hydrogen peroxide depending on the type and severity of the stain.
- Pre-treat Tough Stains: Spray the stain remover directly on tough stains and let it sit for 10-15 minutes before washing.
- Gentle Scrubbing: Use a soft brush or cloth to gently scrub the stain remover into the fabric, helping to lift the stain.
- Store in Dark Bottle: Store the stain remover in a dark or opaque spray bottle to protect the hydrogen peroxide from light degradation.
- Label and Date: Always label the bottle with its contents and the date it was made to track freshness and effectiveness.
- Shake Well Before Use: Shake the bottle well before each use to ensure the ingredients are thoroughly mixed.
- Spot Test: Always perform a spot test on a small, inconspicuous area of fabric before using the stain remover on larger areas.
- Use on Upholstery: The stain remover can also be used on upholstery and carpets; test in an inconspicuous area first.
- Blot, Don’t Rub: When treating stains, blot the area with a clean cloth rather than rubbing to avoid spreading the stain.
- Rinse Thoroughly: After treating a stain, rinse the fabric thoroughly with water to remove any residue before laundering.
- Air Dry if Possible: Allow treated fabrics to air dry whenever possible to ensure the stain is fully removed before applying heat.
- Combination with Detergent: Add a tablespoon of the stain remover to your regular laundry detergent for extra stain-fighting power.
- Cold Water for Blood Stains: Use cold water when applying the stain remover to blood stains to prevent setting the stain.
- Hot Water for Grease Stains: Use hot water with the stain remover to tackle grease stains effectively.
- Apply Immediately: Treat stains as soon as possible to prevent them from setting into the fabric.
- Rubbing Alcohol for Ink Stains: For ink stains, add a small amount of rubbing alcohol to the stain remover mixture for better results.
- Vinegar for Odors: Add a splash of white vinegar to the stain remover mixture to help neutralize odors.
- Borax for Extra Tough Stains: For very stubborn stains, add a teaspoon of borax to the mixture for extra cleaning power.
- Peroxide Strength: Use 3% hydrogen peroxide, which is standard in most stores, for safe and effective stain removal.
- Avoid Dark Fabrics: Use caution with dark-colored fabrics, as hydrogen peroxide can have a bleaching effect over time.
- Spray Bottle Maintenance: Clean your spray bottle regularly to prevent clogs and ensure smooth application.
- Multiple Applications: For extremely tough stains, apply the stain remover multiple times, allowing it to sit for a few minutes between applications.
- Gentle Cycle: When laundering treated fabrics, use the gentle cycle on your washing machine to preserve fabric quality.
- Sunlight for Whitening: Sunlight can help naturally bleach and whiten fabrics after treating with the stain remover.
- Steam Cleaning: For upholstery and carpets, use a steam cleaner after applying the stain remover for deep cleaning.
- Citrus Peels for Scent: Add citrus peels (lemon or orange) to the bottle for a natural, fresh scent infusion.
- Cornstarch for Oil Stains: Mix cornstarch with the stain remover to form a paste for treating oil-based stains before washing.
- Oxygen Bleach: Use oxygen bleach (like OxiClean) with the stain remover for extra brightening and stain lifting power.
- Baking Soda Paste: Create a paste of baking soda and water to pre-treat tough stains before applying the stain remover.
- Use Gloves: Wear gloves when handling the stain remover to protect your skin from potential irritation.
- Non-Abrasive Sponge: Use a non-abrasive sponge when scrubbing stains to avoid damaging delicate fabrics.
- Environmentally Safe Ingredients: Choose environmentally friendly ingredients when possible to minimize impact on water systems.
- Consult Care Labels: Always follow garment care labels and manufacturer instructions when treating stains.
- Pet Stains: For pet stains, add a small amount of enzyme cleaner to the stain remover for effective odor removal.
- Educate Household Members: Teach everyone in your household how to use the stain remover properly to ensure it’s used effectively without damaging fabrics.
These secrets will help you achieve the perfect DIY Homemade Stain Remover for tackling a wide range of stains effectively and safely!
Here are answers to 40 popular questions related to DIY Homemade Stain Removers:
- What is a DIY Homemade Stain Remover?
- A DIY Homemade Stain Remover is a cleaning solution made from common household ingredients like Dawn dish soap, baking soda, and hydrogen peroxide, used to remove stains from fabrics.
- How do you make a DIY Homemade Stain Remover?
- Mix equal parts Dawn dish soap and baking soda with double the amount of hydrogen peroxide in a spray bottle. Shake well before use.
- What ingredients do you need for a DIY Homemade Stain Remover?
- You need Dawn dish soap, baking soda, hydrogen peroxide, and optionally, essential oils for scent.
- Does DIY Homemade Stain Remover work?
- Yes, DIY Homemade Stain Removers are effective for many types of stains, including food, grease, and dirt stains.
- Is DIY Homemade Stain Remover safe for clothes?
- Yes, when used correctly and in appropriate concentrations, DIY Homemade Stain Removers are safe for most fabrics. Always spot test first.
- Can you use DIY Homemade Stain Remover on colored clothes?
- Yes, but spot test first on a small, inconspicuous area to ensure it doesn’t bleach or fade the fabric.
- How do you use DIY Homemade Stain Remover?
- Spray directly onto the stain, let sit for a few minutes, then wash as usual.
- Can DIY Homemade Stain Remover remove old stains?
- Yes, but it may require multiple applications and longer soaking times for old or set-in stains.
- How long should DIY Homemade Stain Remover sit on a stain?
- Let it sit for 5-10 minutes for fresh stains and up to 30 minutes for older or tougher stains before washing.
- Can DIY Homemade Stain Remover be used on upholstery?
- Yes, but test in a small area first. Spray lightly, blot gently with a clean cloth, and let dry.
- Can DIY Homemade Stain Remover be used on carpets?
- Yes, but again, test in an inconspicuous area first. Spray lightly, blot gently, and allow to dry completely.
- Is DIY Homemade Stain Remover safe for sensitive skin?
- The ingredients are generally safe, but gloves are recommended if you have sensitive skin or allergies.
- How do you store DIY Homemade Stain Remover?
- Store in a cool, dark place in a sealed spray bottle. Shake well before each use.
- Can DIY Homemade Stain Remover be used on silk?
- No, it’s best to avoid using it on delicate fabrics like silk. Consult a professional cleaner for such fabrics.
- Does DIY Homemade Stain Remover work on grease stains?
- Yes, it’s effective on grease stains. Apply directly to the stain and let sit before washing.
- Can DIY Homemade Stain Remover be used on blood stains?
- Yes, but use cold water to rinse and treat blood stains to prevent setting.
- Does DIY Homemade Stain Remover work on wine stains?
- Yes, it can help lift wine stains. Apply immediately, let sit, and wash as usual.
- Can DIY Homemade Stain Remover remove ink stains?
- It can help fade ink stains. Add a small amount of rubbing alcohol to the mixture for better results.
- Does DIY Homemade Stain Remover work on grass stains?
- Yes, it’s effective on grass stains. Apply directly and let sit before washing.
- Can DIY Homemade Stain Remover remove pet stains?
- Yes, add a small amount of enzyme cleaner to the mixture for effective pet stain removal.
- Does DIY Homemade Stain Remover work on tomato sauce stains?
- Yes, apply directly to the stain and let sit before washing.
- Can DIY Homemade Stain Remover be used on white clothes?
- Yes, but spot test first to ensure it doesn’t bleach or discolor the fabric.
- Can DIY Homemade Stain Remover be used on denim?
- Yes, it’s safe for denim. Apply directly to the stain and wash as usual.
- Does DIY Homemade Stain Remover work on coffee stains?
- Yes, apply directly to the stain and let sit before washing.
- Can DIY Homemade Stain Remover remove mildew stains?
- It can help fade mildew stains. Apply, scrub gently, and wash as usual.
- Does DIY Homemade Stain Remover work on deodorant stains?
- Yes, it can help lift deodorant stains. Apply and let sit before washing.
- Can DIY Homemade Stain Remover be used on mattresses?
- Yes, but test in an inconspicuous area first. Blot gently and let dry completely.
- Does DIY Homemade Stain Remover work on lipstick stains?
- Yes, apply directly to the stain and let sit before washing.
- Can DIY Homemade Stain Remover remove oil stains?
- Yes, it’s effective on oil stains. Apply directly and let sit before washing.
- Does DIY Homemade Stain Remover work on chocolate stains?
- Yes, apply directly to the stain and let sit before washing.
- Can DIY Homemade Stain Remover be used on vinyl?
- Yes, but test in an inconspicuous area first. Wipe gently and let dry.
- Does DIY Homemade Stain Remover work on rust stains?
- It can help fade rust stains. Apply, scrub gently, and wash as usual.
- Can DIY Homemade Stain Remover be used on leather?
- No, it’s best to avoid using it on leather. Consult a professional cleaner.
- Does DIY Homemade Stain Remover work on tea stains?
- Yes, apply directly to the stain and let sit before washing.
- Can DIY Homemade Stain Remover be used on granite countertops?
- Yes, but wipe gently and rinse thoroughly with water.
- Does DIY Homemade Stain Remover work on vomit stains?
- Yes, it can help lift vomit stains. Apply and let sit before washing.
- Can DIY Homemade Stain Remover remove makeup stains?
- Yes, it’s effective on makeup stains. Apply directly and let sit before washing.
- Does DIY Homemade Stain Remover work on acrylic fabric?
- Yes, but test in an inconspicuous area first. Apply and wash as usual.
- Can DIY Homemade Stain Remover remove curry stains?
- Yes, apply directly to the stain and let sit before washing.
- Does DIY Homemade Stain Remover work on wood furniture?
- No, it’s not suitable for wood. Use appropriate wood cleaners for wood furniture stains.
These answers cover a range of common questions about DIY Homemade Stain Removers, helping you understand how to use them effectively and safely on various types of stains and fabrics.