Cherry Cheesecake Chimichangas


Cherry Cheesecake Chimichangas

Ingredients:

  • 8 oz cream cheese, softened
  • 1/4 cup powdered sugar
  • 1 tsp vanilla extract
  • 1 cup cherry pie filling
  • 8 (8-inch) flour tortillas
  • 1/4 cup granulated sugar
  • 1 tsp ground cinnamon
  • Vegetable oil, for frying

Optional Garnishes:

  • Additional cherry pie filling
  • Whipped cream

Directions:

1. Prepare the Cream Cheese Mixture:

  • In a mixing bowl, beat the softened cream cheese until smooth.
  • Add the powdered sugar and vanilla extract, then beat until well combined and creamy.

2. Assemble the Chimichangas:

  • Lay out the flour tortillas on a flat surface.
  • Spread about 2 tablespoons of cherry pie filling onto each tortilla, leaving a small border around the edges.
  • Spoon a dollop of the cream cheese mixture over the cherry pie filling on each tortilla.

3. Fold and Roll:

  • Fold in the sides of each tortilla, then roll up tightly to enclose the filling, similar to a burrito.

4. Prepare the Cinnamon Sugar Coating:

  • In a shallow dish, mix together the granulated sugar and ground cinnamon until well combined.

5. Fry the Chimichangas:

  • Heat vegetable oil in a large skillet over medium heat until it reaches 350°F (175°C).
  • Carefully place the chimichangas seam-side down in the hot oil, using tongs to prevent splashing.
  • Fry each chimichanga until golden brown and crispy, about 2-3 minutes per side. Adjust the heat as needed to maintain the oil temperature.

6. Coat with Cinnamon Sugar:

  • Remove the fried chimichangas from the oil and drain on paper towels briefly to remove excess oil.
  • Immediately roll each chimichanga in the cinnamon sugar mixture until coated evenly.

7. Serve:

  • Serve the Cherry Cheesecake Chimichangas warm.
  • Optionally, top each chimichanga with additional cherry pie filling and a dollop of whipped cream for extra indulgence.

8. Enjoy!

  • These chimichangas are best enjoyed fresh and warm, with the creamy cheesecake filling and sweet cherry pie flavors.

Nutritional Information (per serving):

  • Calories: 320 kcal
  • Prep Time: 15 minutes
  • Cooking Time: 10 minutes
  • Total Time: 25 minutes
  • Servings: 8

Note:
These Cherry Cheesecake Chimichangas are a delightful dessert twist on a classic Mexican dish, perfect for satisfying sweet cravings with a creamy, fruity filling wrapped in crispy cinnamon-sugar-coated tortillas. Adjust the sweetness to your liking by adding more or less powdered sugar and cinnamon.

Here are some tips to make your Cherry Cheesecake Chimichangas even more delightful:

  1. Cream Cheese Mixture Perfection:
    • Ensure the cream cheese is softened properly before mixing to avoid lumps. Beat it until completely smooth and creamy with the powdered sugar and vanilla extract. You can also add a pinch of lemon zest for a citrusy twist.
  2. Enhance the Cherry Filling:
    • If using canned cherry pie filling, consider adding a splash of almond extract or a squeeze of lemon juice to brighten the flavors. Alternatively, you can make your own cherry compote by simmering fresh or frozen cherries with sugar and a little cornstarch until thickened.
  3. Tortilla Handling:
    • Warm the tortillas slightly before assembling to make them more pliable. This prevents them from tearing when folding and rolling. You can heat them briefly in the microwave or in a dry skillet.
  4. Coating Consistency:
    • Adjust the ratio of sugar to cinnamon in the coating to suit your taste preferences. Some prefer a stronger cinnamon flavor, while others prefer it milder. Taste and adjust accordingly before rolling the chimichangas in the mixture.
  5. Frying Tips:
    • Ensure the oil is hot enough (around 350°F / 175°C) before frying to achieve a crispy exterior without absorbing too much oil. Fry the chimichangas in batches to avoid overcrowding the pan, which can lower the oil temperature and result in soggy chimichangas.
  6. Draining Excess Oil:
    • After frying, place the chimichangas on a wire rack or paper towels briefly to drain any excess oil before rolling them in the cinnamon sugar. This helps keep them crispy.
  7. Serve Warm:
    • These chimichangas are best enjoyed warm when the filling is creamy and the exterior is crispy. Serve them immediately after rolling in the cinnamon sugar for the best texture and flavor experience.
  8. Garnishing Options:
    • Garnish each chimichanga with a dollop of whipped cream or a scoop of vanilla ice cream for a decadent dessert. You can also drizzle them with chocolate sauce or caramel sauce for extra indulgence.
  9. Experiment with Fillings:
    • While cherry pie filling is classic, you can also try other fruit fillings like blueberry, raspberry, or apple pie filling. Match the filling flavors with complementary extracts or spices in the cream cheese mixture for variety.
  10. Make Ahead:
    • While best enjoyed fresh, you can prepare the cream cheese mixture and assemble the chimichangas ahead of time. Fry them just before serving to ensure they are crispy and delicious.

By following these tips, you’ll enhance the flavors and textures of your Cherry Cheesecake Chimichangas, making them a delightful treat for any occasion!

Here are 20 secrets to achieving the perfect Cherry Cheesecake Chimichangas:

Preparation Secrets:

  1. Softened Cream Cheese: Ensure the cream cheese is completely softened at room temperature before mixing. This prevents lumps and ensures a smooth filling.
  2. Add Lemon Zest: For a hint of brightness, add finely grated lemon zest to the cream cheese mixture. It complements the richness and adds a refreshing twist.
  3. Room Temperature Tortillas: Warm the tortillas slightly before assembling to make them more pliable and less likely to tear when folding.
  4. Cherry Pie Filling Enhancement: If using canned pie filling, consider adding a splash of almond extract or a squeeze of lemon juice to enhance the cherry flavor.
  5. Homemade Cherry Compote: Make your own cherry compote with fresh or frozen cherries for a fresher and more intense fruit flavor. Simmer cherries with sugar and a bit of cornstarch until thickened.

Assembly and Cooking Secrets:

  1. Even Filling Distribution: Spread the cream cheese mixture and cherry filling evenly across each tortilla, leaving a border around the edges for easier sealing.
  2. Proper Folding Technique: Fold in the sides of each tortilla before rolling tightly to enclose the filling completely. This ensures the filling stays inside during frying.
  3. Cinnamon Sugar Ratio: Adjust the cinnamon sugar mixture to your preference. Taste and modify the ratio of sugar to cinnamon for a stronger or milder flavor.
  4. Hot Oil Temperature: Heat the vegetable oil to around 350°F (175°C) for frying. This temperature crisps the tortillas quickly without absorbing excess oil.
  5. Fry in Batches: Fry chimichangas in batches to avoid overcrowding the pan, which can lower the oil temperature and result in soggy chimichangas.
  6. Drain Excess Oil: Place fried chimichangas on a wire rack or paper towels briefly to drain excess oil before rolling them in cinnamon sugar. This helps maintain crispiness.
  7. Roll Immediately: Roll each fried chimichanga in the cinnamon sugar mixture immediately after frying while they are still warm. This ensures the sugar adheres well.

Presentation and Serving Secrets:

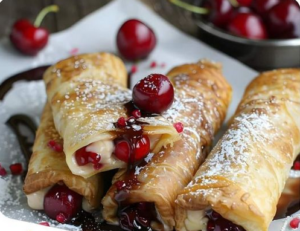
  1. Serve Warm: Cherry Cheesecake Chimichangas are best served warm when the filling is creamy and the exterior is crispy. Serve them immediately after preparing.
  2. Garnish Creatively: Top chimichangas with a dollop of whipped cream, a scoop of vanilla ice cream, or additional cherry pie filling for a delicious presentation.
  3. Drizzle Sauces: Drizzle chimichangas with chocolate sauce, caramel sauce, or a berry coulis for extra indulgence and flavor contrast.
  4. Fresh Herbs: Garnish with fresh mint leaves or a sprinkle of powdered sugar for a decorative touch.

Storage and Reheating Secrets:

  1. Best Served Fresh: Cherry Cheesecake Chimichangas are best enjoyed immediately after frying. If preparing ahead, assemble them but fry just before serving for optimal crispiness.
  2. Reheating Tip: If reheating leftovers, place them in a preheated oven (350°F / 175°C) for a few minutes to crisp up the exterior. Avoid using the microwave, as it can make them soggy.

Variation Secrets:

  1. Experiment with Fillings: Try different fruit fillings such as blueberry, raspberry, or apple pie filling. Match the cream cheese mixture with complementary extracts or spices for variety.
  2. Mini Chimichangas: Make smaller chimichangas for bite-sized treats, perfect for parties or gatherings.

By incorporating these secrets into your preparation, you’ll create Cherry Cheesecake Chimichangas that are crispy, creamy, flavorful, and irresistible!

Here are some popular questions and their answers related to Cherry Cheesecake Chimichangas:

  1. What type of cream cheese should I use for Cherry Cheesecake Chimichangas?
    • Use regular, full-fat cream cheese that has been softened at room temperature. This ensures a smooth and creamy texture for the filling.
  2. Can I use homemade cherry pie filling for this recipe?
    • Yes, you can make your own cherry pie filling using fresh or frozen cherries. Simmer the cherries with sugar and a thickening agent (like cornstarch or tapioca starch) until the mixture thickens. Cool before using in the chimichangas.
  3. How do I prevent the chimichangas from becoming soggy after frying?
    • Ensure the oil is at the right temperature (around 350°F / 175°C) and fry the chimichangas in batches. Drain them on paper towels or a wire rack after frying to remove excess oil.
  4. Can I bake these chimichangas instead of frying them?
    • Yes, you can bake the chimichangas for a healthier alternative. Preheat the oven to 400°F (200°C) and place the rolled chimichangas seam-side down on a baking sheet lined with parchment paper. Lightly brush or spray them with oil and bake for about 15-20 minutes until golden brown and crispy.
  5. What should I serve with Cherry Cheesecake Chimichangas?
    • These chimichangas are delicious on their own but can be served with a scoop of vanilla ice cream, whipped cream, or a drizzle of chocolate sauce for added indulgence.
  6. Can I make Cherry Cheesecake Chimichangas ahead of time?
    • While they are best enjoyed fresh and warm, you can prepare the cream cheese mixture and assemble the chimichangas ahead of time. Fry or bake them just before serving to maintain their crispy texture.
  7. How do I store leftovers of Cherry Cheesecake Chimichangas?
    • Store any leftovers in an airtight container in the refrigerator for up to 2-3 days. Reheat them in the oven to maintain their crispiness.
  8. Can I freeze Cherry Cheesecake Chimichangas?
    • It’s not recommended to freeze chimichangas with cream cheese filling as the texture may change upon thawing. It’s best to enjoy them fresh.
  9. How can I customize the flavors of Cherry Cheesecake Chimichangas?
    • Experiment with different fruit fillings such as blueberry, strawberry, or peach to create variations. Adjust the spices in the cinnamon sugar coating to suit your taste preferences.
  10. What’s the best way to reheat Cherry Cheesecake Chimichangas?
    • Reheat them in a preheated oven (350°F / 175°C) for a few minutes until warmed through and crispy. Avoid using the microwave, as it can make them soggy.

These questions and answers should help you navigate making and enjoying Cherry Cheesecake Chimichangas, addressing common queries that arise during preparation and serving.