Cheesy Beefy Roll


Cheesy Beefy Roll-Ups with Spicy Dipping Sauce

Ingredients:

For the Beef Filling:

  • 2.25 lb ground beef
  • 1/4 tsp seasoned salt
  • 1/4 tsp chili powder
  • 1/4 tsp onion powder
  • 1/4 tsp garlic powder
  • 1/4 tsp black pepper
  • 1 tbsp beef broth
  • 2 tbsp Lipton onion soup packet
  • 1/4 cup purple onion, finely diced
  • 1/4 cup yellow onion, finely diced
  • 1/4 cup green pepper, finely diced
  • 1/4 cup red pepper, finely diced

For Assembly:

  • 8 large flour tortillas
  • 1 cup salsa con queso cheese dip
  • 2 cups shredded cheese (Mexican blend or cheddar)
  • 1 cup cooked white rice
  • 2 tbsp garlic butter

For the Spicy Dipping Sauce:

  • 2 tbsp mayonnaise
  • 1/2 tbsp sour cream
  • 3 tsp buttery buffalo sauce (or hot sauce of choice)
  • Red pepper flakes, to taste
  • Fresh parsley, finely chopped (for garnish)

Instructions:

  1. Prepare the Beef Filling:
    • In a large skillet, cook ground beef over medium-high heat until browned and cooked through.
    • Add seasoned salt, chili powder, onion powder, garlic powder, black pepper, beef broth, and Lipton onion soup packet to the skillet. Stir well to combine.
    • Add diced purple onion, yellow onion, green pepper, and red pepper to the skillet. Cook for 3-4 minutes, until vegetables are softened. Remove from heat and set aside.
  2. Assemble the Roll-Ups:
    • Lay out the tortillas on a clean work surface.
    • Spread salsa con queso cheese dip evenly over each tortilla.
    • Sprinkle shredded cheese over the salsa con queso on each tortilla.
    • Spoon a portion of the cooked beef filling onto each tortilla, spreading it out evenly.
    • Add a spoonful of cooked white rice on top of the beef filling on each tortilla.
  3. Roll and Cook:
    • Roll up each tortilla tightly, folding in the sides as you go.
    • In a large skillet, melt garlic butter over medium heat.
    • Place each rolled tortilla seam-side down into the skillet.
    • Cook for about 3 minutes on each side, or until golden brown and crispy.
  4. Prepare the Spicy Dipping Sauce:
    • In a small bowl, combine mayonnaise, sour cream, and buttery buffalo sauce. Mix until smooth.
    • Adjust the spiciness to your taste by adding more buffalo sauce or red pepper flakes.
    • Garnish with chopped parsley.
  5. Serve:
    • Slice the cheesy beefy roll-ups diagonally.
    • Serve hot with the spicy dipping sauce on the side.

Enjoy these irresistibly cheesy beefy roll-ups with a flavorful beef filling and a zesty dipping sauce that adds just the right amount of kick! Perfect for a delicious and satisfying meal.

Here are some helpful tips to make your Cheesy Beefy Roll-Ups even more delightful:

  1. Seasoning and Flavor: Don’t be afraid to adjust the seasoning levels to suit your taste preferences. You can increase the amount of chili powder or garlic powder for a spicier kick, or add herbs like oregano or cilantro for extra freshness.
  2. Vegetable Variations: Experiment with different types of vegetables in the filling. Try adding mushrooms, corn, or spinach for added texture and flavor. Sauté them with the onions and peppers for a delicious blend.
  3. Cheese Choices: While salsa con queso is great for its creaminess and flavor, you can also mix in other cheeses like shredded Monterey Jack, pepper jack, or mozzarella for added stretchiness and taste.
  4. Meat Options: If you prefer a different meat, such as ground chicken or turkey, feel free to substitute it for the ground beef. Season and cook it similarly for a tasty alternative.
  5. Crispy Texture: Ensure the tortillas get crispy and golden brown by cooking them in enough garlic butter over medium heat. Don’t overcrowd the skillet so each roll-up has enough space to cook evenly.
  6. Dipping Sauce Enhancements: Customize the dipping sauce further by adding a squeeze of lime juice or a pinch of smoked paprika for depth of flavor. You can also serve it with a side of guacamole or salsa for variety.
  7. Garnish and Presentation: Sprinkle some chopped fresh cilantro or green onions over the roll-ups before serving to add a burst of color and freshness. This also adds a nice contrast to the warm, cheesy interior.
  8. Make Ahead: If preparing for a gathering or meal prep, you can assemble the roll-ups ahead of time and refrigerate them. Cook them just before serving to ensure they are hot and crispy.
  9. Serve with Side Dishes: Accompany the roll-ups with sides like a crisp green salad, Mexican rice, or refried beans to make it a complete and satisfying meal.
  10. Enjoy Fresh: These roll-ups are best enjoyed fresh and hot, straight from the skillet. The crispy exterior and gooey cheese filling are at their peak right after cooking.

By incorporating these tips, you can elevate your Cheesy Beefy Roll-Ups to be even more delightful and tailored to your taste preferences. Enjoy experimenting and creating your perfect version!

Here are 40 secrets to help you achieve perfection:

Preparation:

  1. Quality Ingredients: Start with fresh, high-quality ingredients for the best flavor.
  2. Room Temperature Ingredients: Allow ingredients like tortillas and cheese to come to room temperature before assembling for easier rolling.
  3. Proper Seasoning: Ensure the ground beef is well-seasoned with a balanced mix of spices for depth of flavor.
  4. Vegetable Prep: Dice vegetables finely and evenly to ensure they cook uniformly and blend well with the beef.
  5. Cooking Technique: Cook the beef filling until it’s fully browned and any excess moisture has evaporated to prevent soggy roll-ups.

Assembly:

  1. Even Spread of Cheese Dip: Spread the salsa con queso cheese dip evenly over each tortilla to ensure every bite has a creamy texture.
  2. Layering: Layer the ingredients evenly across the tortilla to ensure each roll-up has a balanced mix of flavors.
  3. Compact Rolling: Roll the tortillas tightly but not too tightly to prevent the filling from spilling out during cooking.
  4. Seal the Ends: Fold in the sides of the tortilla before rolling to seal the ends and prevent the filling from leaking out.
  5. Tucking in Ingredients: Tuck in any loose ends of tortilla or filling to create a neat roll-up that cooks evenly.

Cooking:

  1. Medium Heat: Cook the roll-ups over medium heat to ensure they cook through evenly without burning the exterior.
  2. Garlic Butter Enhancement: Use garlic butter for cooking the roll-ups to impart a rich, garlicky flavor and a golden brown crust.
  3. Non-Stick Skillet: Use a non-stick skillet or a well-seasoned cast iron skillet to prevent sticking and ensure even cooking.
  4. Patience with Cooking Time: Allow each side of the roll-ups to cook for about 3 minutes or until they are golden brown and crispy before flipping.
  5. Don’t Overcrowd the Pan: Cook the roll-ups in batches if necessary to avoid overcrowding the pan, which can result in uneven cooking.

Flavor Enhancement:

  1. Layering of Cheeses: Mix shredded cheese varieties for a more complex flavor profile, such as combining cheddar with Monterey Jack.
  2. Fresh Herbs: Sprinkle chopped fresh herbs like parsley or cilantro over the roll-ups before serving for a pop of color and freshness.
  3. Adjusting Spice Levels: Customize the level of spiciness in the dipping sauce and filling to suit your preference.
  4. Additional Sauces: Serve with additional sauces like salsa or guacamole on the side for extra flavor options.
  5. Quality Dipping Sauce: Make sure the dipping sauce is well-balanced and complements the flavors of the roll-ups without overpowering them.

Presentation:

  1. Slicing Technique: Use a sharp knife to slice the roll-ups diagonally for an attractive presentation.
  2. Plating: Arrange the sliced roll-ups on a serving platter with the dipping sauce in a small bowl for easy access.
  3. Garnish: Sprinkle additional shredded cheese, red pepper flakes, or fresh herbs on top of the roll-ups for a finishing touch.
  4. Color Contrast: Serve the roll-ups with colorful side dishes like a mixed greens salad or roasted vegetables for visual appeal.
  5. Warmth: Serve the roll-ups immediately while they are still hot and crispy for the best texture and flavor.

Variations and Creativity:

  1. Experiment with Fillings: Try different fillings like cooked beans, sautéed mushrooms, or grilled chicken for variety.
  2. Vegetarian Options: Create vegetarian versions using beans, tofu, or a mix of vegetables as the filling.
  3. Cultural Fusion: Incorporate flavors from different cuisines by using ingredients like curry powder, teriyaki sauce, or tikka masala paste.
  4. Mini Roll-Ups: Make smaller roll-ups for appetizers or party snacks by using smaller tortillas and adjusting the filling quantities.
  5. Sweet and Savory: Explore sweet and savory combinations by adding ingredients like caramelized onions or mango salsa.

Storage and Reheating:

  1. Reheating Method: Reheat leftover roll-ups in the oven or toaster oven to maintain their crispiness.
  2. Storage Duration: Store leftover roll-ups in an airtight container in the refrigerator for up to 3 days.
  3. Freezing: Freeze assembled but uncooked roll-ups individually on a baking sheet before transferring to a freezer bag for longer storage.
  4. Thawing Before Cooking: Thaw frozen roll-ups in the refrigerator overnight before cooking them to ensure even cooking.
  5. Microwave Tip: If reheating in the microwave, place a damp paper towel over the roll-ups to prevent them from drying out.

Healthier Options:

  1. Leaner Meats: Use lean ground beef or ground turkey to reduce the fat content without sacrificing flavor.
  2. Whole Wheat Tortillas: Substitute whole wheat tortillas for added fiber and nutrients.
  3. Lighter Cheese Options: Use reduced-fat cheeses or less cheese overall to reduce calorie and fat content.
  4. Vegetable Packed: Increase the ratio of vegetables to meat for a lighter, more nutrient-dense filling.
  5. Portion Control: Enjoy smaller portions paired with a side salad or steamed vegetables for a balanced meal.

By following these secrets, you’ll be able to create Cheesy Beefy Roll-Ups that are not only delicious but also perfectly balanced in flavor, texture, and presentation. Enjoy your culinary adventure!

Here are 40 popular questions and answers related to Cheesy Beefy Rolls:

1. What are Cheesy Beefy Rolls? Cheesy Beefy Rolls are tortillas filled with seasoned ground beef, salsa con queso cheese dip, and sometimes rice, rolled up and cooked until crispy.

2. How do you make Cheesy Beefy Rolls? To make Cheesy Beefy Rolls, you brown seasoned ground beef with onions and peppers, spread salsa con queso on tortillas, add the beef mixture and rice, roll them up, and cook in a skillet with garlic butter until golden brown.

3. What kind of tortillas should I use for Cheesy Beefy Rolls? You can use large flour tortillas for making Cheesy Beefy Rolls.

4. Can I use ground turkey instead of ground beef? Yes, you can substitute ground turkey or even ground chicken for ground beef in the recipe.

5. How do you season ground beef for Cheesy Beefy Rolls? Season ground beef with seasoned salt, chili powder, onion powder, garlic powder, black pepper, beef broth, and Lipton onion soup packet for the recipe.

6. What is salsa con queso cheese dip? Salsa con queso is a creamy cheese dip blended with salsa ingredients like tomatoes, peppers, and spices.

7. Can I make Cheesy Beefy Rolls ahead of time? Yes, you can assemble the rolls ahead of time and refrigerate them until ready to cook.

8. How do you cook Cheesy Beefy Rolls? Cook Cheesy Beefy Rolls in a skillet with garlic butter, turning occasionally, until all sides are golden brown and crispy.

9. What kind of cheese should I use for Cheesy Beefy Rolls? You can use shredded Mexican blend cheese, cheddar cheese, or any cheese that melts well.

10. How do you prevent Cheesy Beefy Rolls from falling apart? Roll the tortillas tightly and tuck in the ends before cooking to prevent the filling from leaking out.

11. Can I bake Cheesy Beefy Rolls instead of frying them? Yes, you can bake them in the oven at 375°F (190°C) for about 15-20 minutes, turning halfway through, until crispy.

12. What should I serve with Cheesy Beefy Rolls? Serve them with a side salad, salsa, guacamole, or Mexican rice.

13. How do you reheat Cheesy Beefy Rolls? Reheat in the oven at 350°F (175°C) for about 10 minutes or until heated through, or in a toaster oven for crispy results.

14. Are Cheesy Beefy Rolls spicy? The level of spiciness can be adjusted based on the amount of chili powder and salsa con queso used.

15. Can I freeze Cheesy Beefy Rolls? Yes, you can freeze them before or after cooking. If freezing before cooking, thaw them overnight in the refrigerator before cooking.

16. How long do Cheesy Beefy Rolls last in the refrigerator? Store leftovers in an airtight container in the refrigerator for up to 3 days.

17. Can I make Cheesy Beefy Rolls vegetarian? Yes, omit the ground beef and use a mix of sautéed vegetables or beans as the filling.

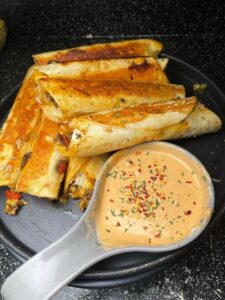
18. How do you make a dipping sauce for Cheesy Beefy Rolls? Combine mayo, sour cream, and buffalo sauce, adjusting the spice level with red pepper flakes.

19. Can I add different vegetables to Cheesy Beefy Rolls? Yes, you can add mushrooms, spinach, or other vegetables to the ground beef mixture for added flavor and nutrition.

20. Can I make mini Cheesy Beefy Rolls for appetizers? Yes, use smaller tortillas and adjust the filling amount for bite-sized roll-ups.

21. What is the best skillet to use for cooking Cheesy Beefy Rolls? A non-stick skillet or a well-seasoned cast iron skillet works best to prevent sticking.

22. Can I use a different type of cheese dip for Cheesy Beefy Rolls? Yes, you can experiment with different cheese dips or sauces for variation.

23. How do I know when Cheesy Beefy Rolls are done cooking? They should be golden brown and crispy on all sides.

24. Can I add rice to Cheesy Beefy Rolls? Yes, cooked white rice can be added to the filling for texture and flavor.

25. Can I add extra cheese to the filling of Cheesy Beefy Rolls? Yes, you can add more shredded cheese to the filling for extra cheesiness.

26. How many Cheesy Beefy Rolls does the recipe make? The recipe typically makes 8 large Cheesy Beefy Rolls.

27. How do I adjust the seasoning to make Cheesy Beefy Rolls less spicy? Reduce the amount of chili powder and adjust other seasonings to taste.

28. Can I use corn tortillas for Cheesy Beefy Rolls? You can use corn tortillas, but flour tortillas are more common for this recipe.

29. How do I prevent the tortillas from getting soggy? Ensure the ground beef mixture is not too wet and drain excess moisture before assembling the rolls.

30. Can I add beans to the Cheesy Beefy Rolls? Yes, cooked beans can be added to the filling for extra protein and flavor.

31. Can I use leftover cooked beef instead of ground beef? Yes, leftover cooked beef can be shredded and used as a filling.

32. How do I make Cheesy Beefy Rolls with a crispy exterior? Cook them in garlic butter over medium heat, turning occasionally, until they develop a golden-brown crust.

33. Can I serve Cheesy Beefy Rolls with a side of sour cream? Yes, sour cream can be served alongside as a dipping sauce or topping.

34. How do I prevent the filling from falling out while cooking? Ensure the tortillas are rolled tightly and secured with the ends tucked in before cooking.

35. Can I use ground pork instead of ground beef? Yes, ground pork can be substituted for ground beef for a different flavor profile.

36. How do I make Cheesy Beefy Rolls gluten-free? Use gluten-free tortillas and ensure all ingredients are gluten-free certified.

37. Can I add diced tomatoes to the Cheesy Beefy Rolls? Yes, diced tomatoes can be added to the filling for extra freshness.

38. How do I store Cheesy Beefy Rolls for meal prep? Store them in an airtight container in the refrigerator and reheat before serving.

39. Can I make Cheesy Beefy Rolls without rice? Yes, you can omit the rice or substitute it with quinoa or another grain.

40. How do I make Cheesy Beefy Rolls kid-friendly? Adjust the spice level and customize the filling to suit children’s tastes, such as adding more cheese or mild salsa.